|
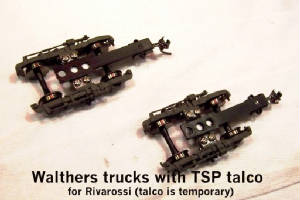
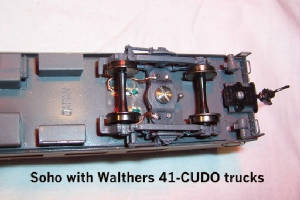
The biggest improvement came when I converted all my lit cars to the Walthers trucks with 8 wheel electrical pick up.
  To take it a step further, I went on a quest for a capacitor and/or a battery that would take care of any remaining dropouts.
There's no rechargeable battery small enough or light enough that will work for me. The rechargeable cell/button batteries
that I could find cannot delivery 20 ma continuously (average draw per car with 6-8 LEDS). The best I found could do 0.5 ma.
Any rechargeable battery that can deliver that current is way too big and heavy for my interiors. I'm not interested in any
battery that needs replacement after 10 hours of use either. I want to minimize handling and "popping open" my cars. Inevitably,
something happens that I have to fix. So, that left capacitors.
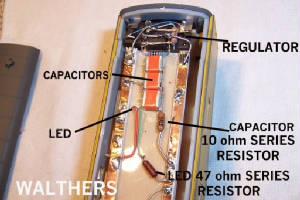
I found a small, lightweight SMD capacitor that is
1500uF at 4volts dc. With the 8 wheel pick up, 3.6volt light rails and 20ma draw, it looks like a set of 3 of these caps in
parallel, with 10 ohms in series with the set appears to be doing the trick. The caps easily fit in the roof area of my cars,
in between the light rails. I could easily put a dozen of these caps in the roof area. The caps are small enough to put in
lockers or dark rooms with the shades pulled, etc. The voltage on these caps has a limit of 4v dc.I AM STRONGLY AGAINST using
even one of these high capacity caps across the output of a regulator without a series resistor. The cap will initially look
like a dead short to the regulator when it is charging, and damage to the regulator may occur. Even regulators with over current
protection may become compromised with the repeated charging and discharging of the caps.
3.6 volts and 10 ohms means
my regulator will see a maximum peak of 360 ma, which is well below its 1 amp maximum. The regulator will only see that load
when the cap charges, and for a relative short time. That maximum load time depends on how much total capacitance and series
resistance there is.
360ma x 3.6v = 1.3 watts that the series 10 ohm resistor will see, but it is for a short time,
so a 1 watt resistor is not necessary. I'm using 1/4 watt resistors on my cap circuits, and I feel no heat what so ever on
the resistor after repeatedly charging and discharging.
The more LEDS and the brighter the LEDS, the more the current
demand, and more caps will be needed to get the same filtering. My dome obs lounge will need at least 6 caps, because it has
17 LEDS, drawing about 40 ma. Also, for those cars with 4 wheel electrical pick up (wipers, all metal trucks) more caps will
be needed to achieve the same effect has I did. This will require some experimentation by those users to determine how many
caps are needed, cause I no longer have any cars with wipers or all metal trucks. A dc incandescent circuit will require a
lot more caps cause of the large current demands, but remember, NOT OVER 4 volts dc on these caps and don't over heat the
resistors. Any amount of caps will help reduce the duration of the dropouts. I say "do what you can". These caps cannot be
used in AC circuits, cause the caps are polarized (plus and minus terminals). Yep, there's a big down side. These caps are
pricey; $6.50 at mouser.com, but the price goes down quickly with quantity. I got 25 for $4.25/ea; 100 was listed for $2.60/ea.
 Part number for capacitor is 597D158X9004R2T. The data sheet is available at Mouser.
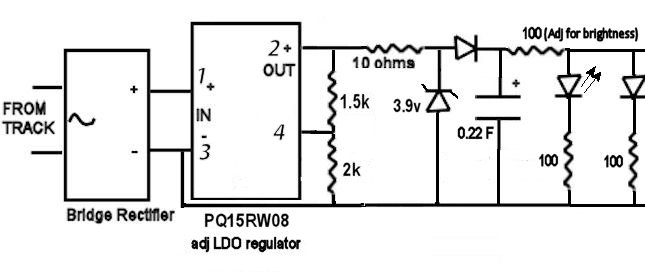
SUPER CAPACITOR
Where I have room, I use the 0.22F super cap shown in the diagram. This capacitor requires a significant amount of space,
and couldn't be hidden in my dome obs, diner or coach car. In sleepers it can be hidden in a darkened and shaded
bedroom. Other places it could be hidden is unused/unseen vestibules areas, toilets, large lockers, aisles or mens/womens
lounges. It is important to use a low ESR (equivalent series resistance) cap. The cap is pricey, but provides
the best filtering so far. The part number is PA-5R0V224-R and is made by PowerStor/Cooper Bussman. I get mine at Mouser.
|
|
I got to say, that it has been a sweet experience to finally sit back and watch my train go around all lit up and see my interiors
with no distracting dropouts. It's really cool to be creeping along at 5-10 mph, and no flicker. It's been worth every penny
and minute of work. Still have to clean track and wheels once and awhile, but a lot less than before, and I have a small,
reliable, low power, hands-off interior lighting system. If anyone needs help, please feel free to contact me.
These are not intended to be final solutions. I will continue to look for smaller, lighter, cheaper devices
and better solutions. I don't think it will be too long before we will see a small rechargeable battery that will deliver
the current needed.
|