|
Getting the inside surface ready
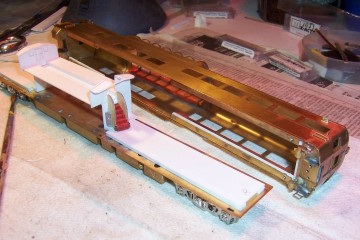
The naked brass in the Soho really needs it. There is a lot of excess solder all over the inside, little pieces of
brass from outside components sticking out, rough edges, and it’s all corroded and dirty. I use a lot of scratch
built overlays for the walls, especially in the brass cars, so the surface needs to be cleaned up (more on overlays later).
I used a dremel and sand paper to carefully smooth down those solder blobs and grind/cut protrusions. I got a
little too picky once, removed too much solder, and a butt seam cracked. Had to fix that. That’s why I use
overlays. It’s just too much of a hassle to get the inside surface of a brass car smooth enough for a finished
wall. I tried to leave about .005-.010 in of solder everywhere. I tried flexing the butt seams. The
car seems more than sturdy enough, and it’s smooth enough for the overlays. I also removed the step boxes
and the plate they are on so I could paint, mask and glaze the vestibule area. There were 3, weak solder tacks that were easy
to cut loose. I just glued it back in later with JB weld after all the painting was done.
When the machining
and smoothing is done, I clean the surfaces with PPG grease and wax remover. I get it at Tri City paint, along with
my blue painter’s masking tape. I’ve even used this cleaner lightly on my clear styrene and painted surfaces
with no ill effects. It will remove fresh paint, but takes a lot of rubbing to remove cured paint.
On the Walthers
cars, I take them apart. I very carefully pop the sides off. I pop out the glass by carefully cutting the glue
joints and cutting the glass into sections, if needed. I always get a new blade at this point. The glass gets tossed.
I make my own window glass. I also take the frame box off and the detail piece out. I smooth and clean up the
wall surfaces for finish painting on the Walthers cars, cause I don’t overlay or build any partitions in the Walthers
cars; just paint, glaze, add some shades and sharpen up what is there. All gets painted, but not yet.
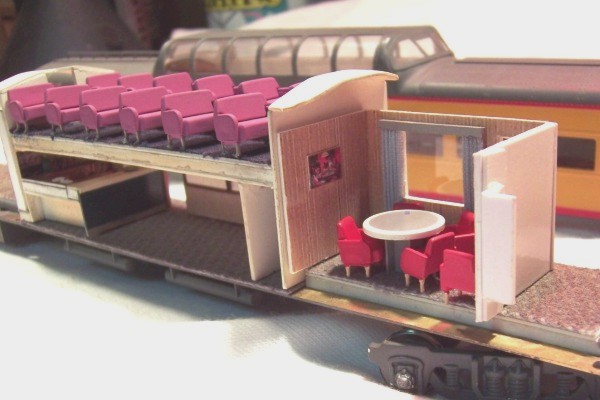
The Rivarossi
cars get wall overlays, partitions, curtains, furniture, carpeting - the works, like the Soho.
Laying out and designing the interior
I got the interior surfaces all smoothed, cleaned and ready to paint. But, before painting, I designed and constructed
as much of the partitions and rooms as I could. (get a new #11 blade). I didn't worry about all the detail in
the rooms at this point, but constructed the outside walls, cut out the doors, etc. I worked on getting a good fit and
how everything would attach in there.
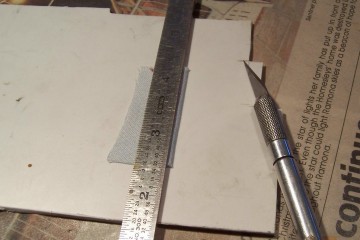
I also made as many patterns/templates of the walls that I could. These would be used later to cut out the finished
overlays (if your like me, you have a lot of clear styrene laying around that's been scratched too much to use for glazing
the windows - this is a good place to use it - more later on making the finished overlays). I cut some .010in styrene
sheet into pieces, fitted and trimmed until each piece covered the particular wall area that I was working on. For those
pieces that include windows, I held the piece in place on the inside, or taped it down in position if there was room, and
scribed out the windows from the outside. I used the scribes; a blade can scrape the inner edges of the windows.
Then I cut out the windows (get a new blade), test fitted, trimmed, started over until I was satisfied with the fit of each
piece and how they lined up with each other. In coach, lounge or dinner areas where there are curtains or other window
dressings, I just made a strip for the wall area above and a strip for the area below the windows. I covered the area
between windows later with the curtains or window dressings. I spent a lot of hours making and remaking those templates,
so I stored them somewhere safe for later.
I cleaned the inside surfaces again, and painted the wall areas the color that I wanted to show as a thin outline around
the windows, or as a floorboard or other detail. I did the dome obs walls in steel. The ceiling I did in cream
(the color of the ceiling will have some effect on the over all color of the interior light and the final effect).
To paint the inside of the side pieces on the Walthers cars, without screwing up the outside paint job,
including the inner edges of the windows, I stuffed some Play-Doh through the window openings from the outside. Then
I shaped the doh on the inside with a tooth pick to get the inner window edges masked without covering the inside wall surface.
The doh cleans off easily.
While the inside is curing (min 4 days to be able to withstand masking - more the safer), I had the partitions/rooms to
paint and detail. I also had some overlay sheets to design and print out on the computer, curtains to make, chairs,
flooring, research.........
  Lighting Materials, Layout and Construction
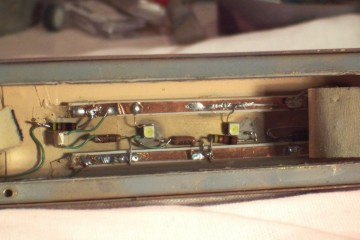
Ok. The interior surface paint has been applied and is cured. I cut small strips of copper tape and used them
to make the electrical runs back, forth and around the car. Since the brass conducts, I put down strips of Scotch Super
tape (packing tape) first, and then laid down the copper on top of it. I ended up with less than .005in build up.
That's small enough to overlay without bulges. I got strips running behind wall panels/overlays, under carpeting, and
it makes good contact points. Obviously, electrical insulation is not necessary on the plastic stuff. But, keep in mind
that you have to heat up that copper to solder. Too much heat and too long of an exposure will warp and melt the plastic.
That is REAL bad! The layer of packing tape will help, but this is where a variable temperature soldering station
comes in handy. Set it as low as possible, and still be able to flow the solder. I strongly suggest practicing
on a junk car to get the technique down. If one has the head room, putting .060 styrene strips under the CU tape is much
safer.
I made 2 light rails to run across the ceiling from end to end using .060 or .080 styrene strips and the copper tape.
At the spots where I glued the rails down, I scratched off the paint down to the bare surface. I set the rails down
at masking tape width.
(See Lighting and Electrical for pics and more info)
 Furnishings and finish
It's hard to imagine how I would make skinny little fake wood paneling, tiny little pictures and signs
on the wall or a decal without a computer. I find just about every pattern or picture I want on the
net. All the paint, capture and image manipulation software, plus the print technology
make the computer a very creative tool for a modeler. I think everyone here has caught on to that. When shrinking
an image, I resample at a higher resolution. Normally, 600 dpi works. I clear coat the printed sheets of photo
paper with Krylon Crystal Clear Satin. The paper should last a long time and shouldn't fade or yellow. Colors will darken,
so I allow for that. Using the wall templates I made earlier, I cut out the overlays (get a new blade, and often) from
the printed sheets. When I'm satisfied that the finish overlay or picture/sign is good enough and fits in there, I clear
coat it lightly again to get all the edges.
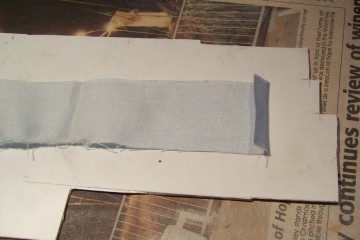
When working with fabric for carpeting or the chair guard panels under coach windows,
I back the fabric with the clear packing tape. It helps minimize fraying, holds the shape and the glue doesn't seep
through. For different pile, patterns or to alter the color a little, I airbrush Dulcote and/or paint.
Making curtains and drapes out of fabric is somewhat tedious. I cut about 3in wide by
6in long strips of the fabric I want to use. I lay down a strip, backside up, on a sheet of plastic. Starting
at one end, I fold back about 1/2in to make a crease across the strip. I open the fold back up and spread a fair amount
of Testor Clear Parts Cement and Window Maker in the crease and about 1/4in to each side of it, fold the fabric back over
and press it down. I use just enough of the glue to slightly soak through the fabric. It dries clear. I
cut the folded piece about an inch from the end, and continue down the strip, making a bunch of single folds in the same manner.
After the glue sets, I cut the folds off (get a new blade, and often) with a straight edge about .040in from the end of the
fold. By varying this dimension, I get curtains of different thickness. I then glue, using small amounts of CA
glue, the .040in strips on top of each other till I get the width of curtain I want. My 2x2 wood block with a strip of tape,
sticky side up, comes in handy here for laying out and holding the strips. If I want a curtain that looks partly drawn
open, I glue thicker folded strips on edge between the tight folds. After the CA glue sets, I cut curtains to desired
length.
I use silver reflective tape, cut to desired size and shape for small mirrors, and auto rear view
mirror repair material for large wall mirrors. 1 roll of the tape will last a very long time. The tape is pretty sticky,
but a drop or 2 of AC at critical places makes me feel a little more secure. Just a little paint, a few passengers and
some mirrors is a simple, quick way to give those factory interiors added dimension and attention.
I start assembling with glazing the windows. I cut .005 or .010in strips of clear styrene long enough to cover as
many windows in an area as possible, and then glue them down. This is one reason why I like brass. The walls are
thin, and the glazing, shades and wall overlays end up giving a thicker, more real appearance, and the windows look flush.
Next I build up the area around the glazing with scrap styrene to keep the wall surface flat for mounting the shades and overlays.
I make my shades out of scrap .005in styrene, and taller than the window so I can glue them down above the window. It's
a lot easier and cleaner than gluing them to the window pane itself. I put the wall overlays down, glue in the curtains,
and that's about it...well, except for the re-dos. With .005 glazing, .005 shades and .010 paper, only .020in per wall is
taken away from the inside dimension.
Molding and Casting Lounge Chairs
I counted 10 different style chairs in the 2 lounges of the UP ACF Dome Obs Lounge. The dome divans and card room make it
12. I wanted to represent that variety in my Soho model. Since no one made something close enough that I could bash, I sculpted,
molded and cast most of the chairs.
I used an air drying clay to sculpt the individual pieces. I got a brick of that stuff, and it needs to be kept moist
when stored.
For molds and casts, I started with the Alumilite kit. Right off, I didn't like the 10/1 by weight mix of the rubber.
I just halved the parts and got 3 molds out of it with a lot of waste and thrown out rubber. The resin is easier to mix,
but since I use a syringe to slowly pour the resin, it just set up way too fast for me. Lot of waste there, too. So I got
the Micro Mark 1/1 Si rubber and the longer setting 600 resin. Both brands gave good end results. The MM stuff is just more
suited to my work methods.
It's not difficult to mold and cast if the directions are followed. I made a good mold and cast good parts the first
time. It's VERY IMPORTANT to stir/mix the individual parts in their containers before measuring and combining them. This
goes for the mold rubber and the resin. The containers need to be kept sealed as much as possible, cause the chems readily
absorb moisture. The only thing I added was storing the containers in zip-lock baggies. The MM directions said to mix at
least 1 fluid oz of each part for the resin. That made a lot of waste. I had no problem just doing 1/4 oz of each.
I had to do a series of molds and casts. The bar lounge has 9 of the same style chairs, so it took some duplicating to
get a final production mold. I also had some adjustments to parts has I went along.
A lot of the lounge chairs are curved or rounded with a back that is separated from the seat bottom and supported with
braces or the leg pieces that extend through the seat bottom and up to support the back piece. It was just to much for me
to try and create that space/brace between the seat bottom and back. So, I sculpted, molded and cast a seat bottom and a
back for each of those style of chairs. It made sculpting and molding a lot easier. Glued together, they sort of give that
2 piece look.
I use small resistor leads or pins from a IC DIP header for the legs, and drill holes for them in the seat bottom with
a 78-79 drill bit. There's some excess material from the pour to trim/sand off on the bottom of each piece, and a little
shaping/rounding to do, but it's easy - just tedious.
There are a couple of "in progress" pics of the chairs in the Photo Albums.
|


